Raspberry Pi 5 安装 Arch Linux
/ 9 min read
Table of Contents
最近买的 Pimoroni 的 Nvme SSD 板到了, 就开始往上装 Arch
因为我没有 Micro HDMI 的线和读写 SSD 的工具, 就打算和正常装系统一样用个 usb boot 进去里面装,同时也得一直 Headless
0. 准备
- Raspberry Pi 5
- USB
- 网线
- PC
- SSD
1. 刷 USB Boot
用 sudo pacman -S rpi-imager 下载 rpi-imager 然后往 USB 里刷一个 Raspberry OS 然后配置好 SSH 密码
2. USB Boot 准备
- 把 USB 插到 Pi 5 上
- 把网线从 Pi 上连到 PC, 然后进设置把类型改成
share with other computer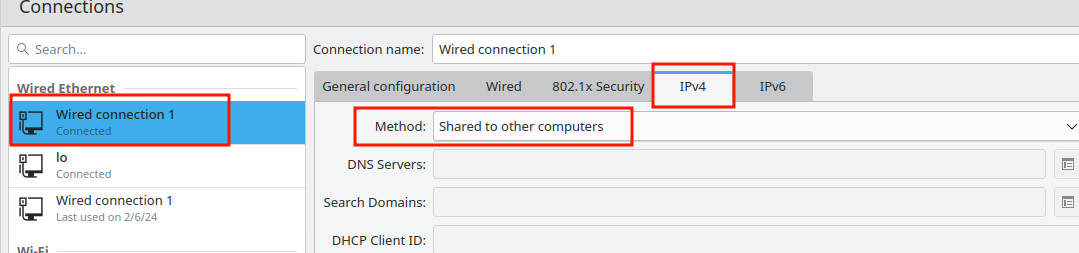
- 用
ip a拿到 PC 有线的 ip 比如10.42.0.1, 然后用nmap -sn 10.42.0.0/24(没有nmap就装) 扫 Pi 的 ip (比如我这里是10.42.0.83)
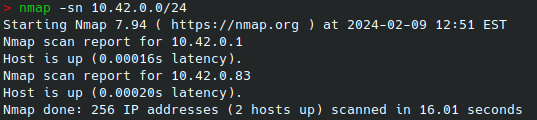
ssh [email protected]和前面设的密码连接sudo apt-get update && sudo apt-get upgrade更新一下系统
如果通过网线出不了网可能是dhcpcd,iptable之类的问题sudo rpi-eeprom-config -e里改BOOT_ORDER, 比如BOOT_ORDER=0xf64就是先尝试加载USB(4) 然后nvme(6) 然后重复 (f). 参考raspberrypi.com/documentation/computers/raspberry-pi.html#BOOT_ORDERsudo rpi-eeprom-update -a更新一下固件
3. 配置 nvme
参考 pimoroni, 基本除了更新 pi 的固件不需要配置, 如果 lsblk 看不到 SSD 可能是要重启
4. 安装 Arch
- 进 USB boot 的 SSH
- 分盘, 我一般用
cfdisk分(比如sudo cfdisk /dev/nvme0n1), 最少分两个盘, 一个>=300Mb的 boot 和一个主盘’ - 用
sudo apt install libarchive-tools来安装bsdtar - 用
root运行以下脚本(建议写到一个脚本文件里然后sudo), 脚本来自 kiljan.org/2023/11/24/arch-linux-arm-on-a-raspberry-pi-5-model-b
执行前要去找新的下载链接(见注释)这里是#!/bin/bash# SSD 的路径export SDDEV=/dev/nvme0n1export SDPARTBOOT=/dev/nvme0n1p1export SDPARTROOT=/dev/nvme0n1p2export SDMOUNT=/mnt/sdexport DOWNLOADDIR=/tmp/piexport DISTURL="http://os.archlinuxarm.org/os/ArchLinuxARM-rpi-aarch64-latest.tar.gz"mkdir -p $DOWNLOADDIR(cd $DOWNLOADDIR && \curl -JLO $DISTURL)# 已经分过盘了#sfdisk --quiet --wipe always $SDDEV << EOF#,256M,0c,#,,,#EOFmkfs.vfat -F 32 $SDPARTBOOTmkfs.ext4 -E lazy_itable_init=0,lazy_journal_init=0 -F $SDPARTROOTmkdir -p $SDMOUNTmount $SDPARTROOT $SDMOUNTmkdir -p ${SDMOUNT}/boot/firmwaremount $SDPARTBOOT ${SDMOUNT}/boot/firmwarebsdtar -xpf ${DOWNLOADDIR}/ArchLinuxARM-rpi-aarch64-latest.tar.gz -C $SDMOUNTrm -rf ${SDMOUNT}/boot/*mkdir -p ${DOWNLOADDIR}/linux-rpipushd ${DOWNLOADDIR}/linux-rpi# 这里需要自己去找链接, 不然可能 404# 去 https://archlinuxarm.org/packages/aarch64/linux-rpi 然后复制下载链接curl -JLO http://mirror.archlinuxarm.org/aarch64/core/linux-rpi-6.6.16-1-aarch64.pkg.tar.xztar xf *cp -rf boot/* ${SDMOUNT}/boot/firmwarepopdsyncumount -R $SDMOUNT/boot/firmware而不是/boot参考 raspberrypi.com/documentation/computers/configuration.html#the-boot-folder. - 挂载 SSD (可以写成脚本文件)
#!/bin/bashmount /dev/nvme0n1p2 /mnt/sdmount /dev/nvme0n1p1 /mnt/sd/boot/firmware
- 编辑
sudo vim /mnt/sd/etc/fstab, 改成你的盘# Static information about the filesystems.# See fstab(5) for details.# <file system> <dir> <type> <options> <dump> <pass># <pass> is the order of loading parition# main partition/dev/nvme0n1p2 / ext4 defaults 0 1# boot partition/dev/nvme0n1p1 /boot/firmware vfat defaults 0 2 - 编辑
sudo vim /mnt/sd/boot/firmware/cmdline.txt我这里用的是盘的# root=/dev/nvme0n1p2 rootfstype=ext4 rw rootwait console=serial0,115200 console=tty1 fsck.repair=yes# root=UUID=0000-0000 rootfstype=ext4 rw rootwait console=serial0,115200 console=tty1 fsck.repair=yesroot=PARTUUID=00000000-0000-0000-0000-000000000000 rootfstype=ext4 rw rootwait console=serial0,115200 console=tty1 fsck.repair=yesPARTUUID, 理论上用路径或UUID应该也可以, 通过ls /dev/disk/by-partuuid -al,ls /dev/disk/by-uuid -al和lsblk可以拿到 - 关机, 拔掉 USB, 重启
5. 配置 Arch
- 滚下系统
- [可选] 加 SSH
~/.ssh/authorized_keys - 同步下时间
ntp - 设置
locale - [可选] 安装
zshomz - 无线网络
- 安装
NetworkManager:pacman -S NetworkManager,systemctl enable --now NetworkManager- 用
nmtui启用 TUI 来配置
- 用
- 或安装
iwd来连接无线网:pacman -S iwd,systemctl enable --now iwd- 用
iwctl然后station wlan0 connect <UID>来连接 sudo systemctl enable --now iwd开机启动系统服务- 编辑
sudo vim /etc/iwd/main.conf, 加入来让 wifi 自动连接, 使用内置[Settings]AutoConnect=true[General]EnableNetworkConfiguration=true[Network]EnableIPv6=truedhcph和ipv6
- 用
- 安装
- [可选?] 安装
dhcphsudo systemctl enable --now dhcph- [可选?] 在
/etc/dhcpcd.conf禁用 ipv6
- 新建用户, 删除 alarm
- 改
hostname(默认是alarm) - [可选] 安装
linux-rpi-16k- 如果安装后一直
boot进旧的 也就是linux-rpi内核, 可以试着用/boot/kernel8.img覆盖/boot/firmware/kernel8.img
- 如果安装后一直
- [可选] Arch 下的
sudo pacman -S rpi5-eeprom来更新固件 - [可选] 如果要修复
pacman里生成 image 的可以编辑==> WARNING: errors were encountered during the build. The image may not be complete.error: command failed to execute correctly/etc/mkinitcpio.conf的HOOKS那一行, 去掉kms参考 archlinuxarm# removed kmsHOOKS=(base udev autodetect modconf keyboard keymap consolefont block filesystems fsck)
Troubleshooting
如果遇到什么奇怪的内核问题, 比如安装了 16k page 的新内核但是一直在加载旧内核(表现为 uname -a 里和 lsmod 为空之类), 或者 pacman -Syyu 更新内核后有一些问题, 可能是因为内核的 PKGBUILD 里面装到 /boot/kernel8.img 去了(因为我看不到 Arch Linux ARM 的 PKGBUILD 文件所以不能确认). 可以试一下 sudo cp /boot/kernel8.img /boot/firmware/kernel8.img 来覆盖看看能不能修.
6. [可选] Cloudflare 公网 SSH
因为
cloudflare提供tunnel, 我们可以用tunnel来做 Pi 的公网 SSH (以及其他要公网的服务, 相当于内网穿透)
- 进 pi 的 arch 的 SSH
- 接下来可以用 docker 的
cloudflared或者手动编译 (因为 issue#1151 提到在2024.1.0后要自己编译go标准库, 不然开不了通道), 我这里选的是手动编译 - 通过
编译
Terminal window git clone https://github.com/cloudflare/go.gitcd go/src./make.bashcloudflare的go标准库 - 把
go/bin/加到PATH里 - 通过
编译
Terminal window git clone https://github.com/cloudflare/cloudflared.gitcd cloudflaredmake cloudflaredcloudflared - 把
cloudflared/加到PATH里 - 在
cloudflare网页上创建一个tunnel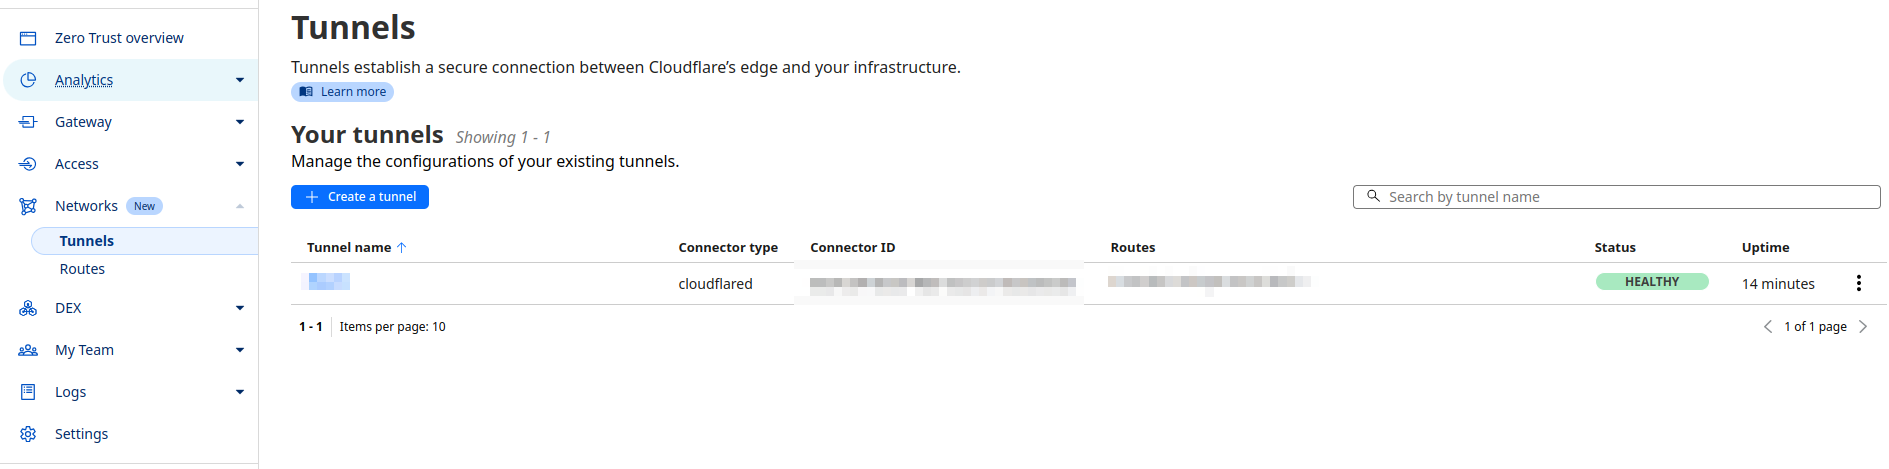 然后在里面创建协议为
 SSH的public hostname - 复制
cloudflared网页上的tunnel配置, 比如Terminal window sudo cloudflared service install <TOKEN> sudo systemctl enable --now cloudflared- 然后在 pc 上安装
sudo pacman -S cloudflared - 在
.ssh/config里写cloudflared的ProxyCommand为cloudflared access ssh --hostname %h, 参考 developers.cloudflare.com/cloudflare-one/connections/connect-networks/use-cases/ssh
7. [可选] GUI
直接 Hyprland
注意是 pacman -S hyprland 和 Hyprland 启动, 大写 H
8. [可选] 更新 Bootloader
如果风扇没有在开机后(温度不到)时自动关闭, 或者根本不启动,可能是因为 Bootloader 要更新
- AUR 里这个 rpi-eeprom-git 应该过时了,我目前是手动安装的.
- 下载或者手动复制这个文件到本地 PKGBUILD 和 rpi-eeprom.install.
- 把里面第四行
pkgname=(rpi4-eeprom rpi5-eeprom)这里去掉一个不然conflicts会爆 (因为会试图安装两个包). - 然后在目录下
makepkg -si安装. - 运行
sudo rpi-eeprom-update. - 需要复制新的固件从
/boot到/boot/firmware, 比如sudo cp /boot/bcm2712-rpi-5-b.dtb /boot/firmware/bcm2712-rpi-5-b.dtb, 具体名字是哪个可以用sudo vclog --msg看, 覆盖, 然后再重启一次
9. /boot 还是 /boot/firmware?
从 rpi-eeprom-update#L734 来看, 优先级是先是 /boot/firmware 然后再是 /boot, 前面我们3.5 fstab 挂载的也是 /boot/firmware.
但是因为某些原因 (可能比如 pi 4 里默认是 /boot), 相当一部分系统更新, 比如 linux-rpi-16k, 打包后还是解压到 /boot 里导致不能正确更新.
所以我目前的暂时解决方法是:
- 每次更新完系统 (
mkinitcpio跑后) 手动用sudo cp /boot/kernel8.img /boot/firmware/kernel8.img覆盖 - 每次更新完固件后 (通过
rpi-eeprom-update), 手动用sudo cp /boot/bcm2712-rpi-5-b.dtb /boot/firmware/bcm2712-rpi-5-b.dtb覆盖 (具体名字可能有变)
或者应该也可以一开始通过用 /boot 而不是 /boot/firmware 来解决, 但是我目前 pi 5 是无头模式就懒得折腾重装系统了
一些可能的 Raspberry Pi 应用面
WIFI 无线中继
如果你和我一样(幸运得(x))买到一张板载 MEDIATEK 7927 的主板, 他从2024到2025一年多还没可用的驱动. 那么就可以用树莓派救急当作无线中继(普通路由器也有这个功能).
配置也非常简单, nmtui 修改连接, 然后修改 wired connection 有线连接里面 ipv4 从 automatic 到 shared 模式. 然后就可以通过网线共享无线网络
GitHub self hosted runner
见 https://docs.github.com/en/actions/hosting-your-own-runners/managing-self-hosted-runners/adding-self-hosted-runners, 配置就是跑一个脚本
self hosted website analytics
我是跑的 umami 的 docker
self hosted password manager
Zotero Webdav
就用 nginx 跑个 webdav 服务给 zotero 开文件共享